
Pada postingan kali ini akan menshare tentang pengolahan citra menggunakan java. Citra terdiri dari RGB (Red, Green, Blue) yang kemudian akan diolah untuk menghasilkan sebuah image yang mengandung RGB. Intinya adalah mengolah suatu citra untuk diambil warna RGBnya. Sehingga hasil dari citranya tersebut menjadi tidak berwarna (hitam/putih).
Berikut langkah-langkahnya :
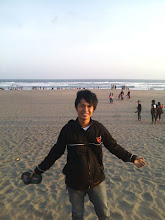
1. Siapkan sebuah image/picture/gambar yang mengandung warna RGB.
2. Kemudian membuat classnya sebagai berikut:
import java.awt.Image;
import java.awt.Toolkit;
import java.awt.image.ColorModel;
import java.awt.image.ImageProducer;
import java.awt.image.IndexColorModel;
import java.awt.image.MemoryImageSource;
import java.awt.image.PixelGrabber;
public class ProCitra {
    Image image;
    int widht=0;
    int height=0;
    int pixels [];
    byte R [];
    byte G [];
    byte B [];
    byte grey []=new byte[256];
    ColorModel greyModel;

    int getPixel(int x, int y){
        if( x > widht) x = 0;
        if (y > height) y = 0;
        return pixels[(widht*(x-1)+y)];
    }
    int getRed(int x, int y){
        if( x > widht) x = 0;
        if (y > height) y = 0;
        return R[(widht*(x-1)+y)];
    }
    int getGreen(int x, int y){
        if( x > widht) x = 0;
        if (y > height) y = 0;
        return G[(widht*(x-1)+y)];
    }
    int getBlue(int x, int y){
        if( x > widht) x = 0;
        if (y > height) y = 0;
        return B[(widht*(x-1)+y)];
    }

    void grabberImage(){
        PixelGrabber grabber=new PixelGrabber(image,0,0,-1,-1,true);
        try {
            if (grabber.grabPixels()) {
                widht = grabber.getWidth();
                height = grabber.getHeight();
                pixels = (int[]) grabber.getPixels();

                R=new byte[pixels.length];
                G=new byte[pixels.length];
                B=new byte[pixels.length];

                for(int i=0; i
                    B [i]=(byte) (pixels[i] & 0x0000FF);
                    G [i]=(byte) ((pixels[i] >> 8)& 0x0000FF);
                    R [i]=(byte) ((pixels[i] >> 16)& 0x0000FF);
                }
            }
        } catch (Exception ex) {
        }
    }
    ProCitra(){
        image=null;
        setGreyModel();
    }
     ProCitra(String s) {
        image=Toolkit.getDefaultToolkit().getImage(s);
        setGreyModel();
    }

    public void readImage(String file){
        image = Toolkit.getDefaultToolkit().getImage(file);
        setGreyModel();
    }
    public Image getImage(){
        return image;
    }
//mengambil warna RED
    public Image getRedImage(){
        ImageProducer ip=new MemoryImageSource(widht, height, greyModel, R, 0, widht);
        return Toolkit.getDefaultToolkit().createImage(ip);
    }
//mengambil warna GREEN
    public Image getGreenImage(){
        ImageProducer ip=new MemoryImageSource(widht, height, greyModel, G, 0, widht);
        return Toolkit.getDefaultToolkit().createImage(ip);
    }
//mengambil warna BLUE
    public Image getBlueImage(){
        ImageProducer ip=new MemoryImageSource(widht, height, greyModel, B, 0, widht);
        return Toolkit.getDefaultToolkit().createImage(ip);
    }
    final void setGreyModel(){
        for(int i=0;i<256 data-blogger-escaped-byte="" data-blogger-escaped-grey="" data-blogger-escaped-i="" data-blogger-escaped-span="">
        greyModel=new IndexColorModel(8, 256, grey, grey, grey);
    }
    //RGB dijumlah/3 dimasukkan ke pixels
    void RGB2Grey(){
        for(int i=0;i
            pixels[i]=(int) ((R[i]+G[i]+B[i])/3);
        }
        ImageProducer ip=new MemoryImageSource(widht, height, greyModel, pixels, 0, widht);
        image=Toolkit.getDefaultToolkit().createImage(ip);
    }

}
3. Desain sebuah Frame untuk menampilkan image yang telah diolah.

Tambahkan listing code pada masing-masing tombol :
private void RAWActionPerformed(java.awt.event.ActionEvent evt) {
        // TODO add your handling code here:
        ProCitra img=new ProCitra("gambar.JPG");
        img.grabberImage();
        Image image=img.getImage();
        ImageIcon icon=new ImageIcon(image);
        jLabel1.setIcon(icon);
        repaint();
}

private void BLUEActionPerformed(java.awt.event.ActionEvent evt) {
        // TODO add your handling code here:
        ProCitra img=new ProCitra("gambar.JPG");
        img.grabberImage();
        Image image=img.getBlueImage();

        ImageIcon icon=new ImageIcon(image);
        jLabel1.setIcon(icon);
        repaint();
}

private void GREENActionPerformed(java.awt.event.ActionEvent evt) {
        // TODO add your handling code here:
        ProCitra img=new ProCitra("gambar.JPG");
        img.grabberImage();
        Image image=img.getGreenImage();

        ImageIcon icon=new ImageIcon(image);
        jLabel1.setIcon(icon);
        repaint();
}

private void REDActionPerformed(java.awt.event.ActionEvent evt) {
        // TODO add your handling code here:
        ProCitra img=new ProCitra("gambar.JPG");
        img.grabberImage();
        Image image=img.getRedImage();

        ImageIcon icon=new ImageIcon(image);
        jLabel1.setIcon(icon);
        repaint();
}

private void GREYActionPerformed(java.awt.event.ActionEvent evt) {
        // TODO add your handling code here:
        ProCitra img=new ProCitra("gambar.JPG");
        img.grabberImage();
        img.RGB2Grey();
        Image image=img.getImage();
        ImageIcon icon=new ImageIcon(image);
        jLabel1.setIcon(icon);
        repaint();
    }
Hasilnya adalah sebagai berikut :


4 Komentar
apik cak....
Balasmohon share dan bimbingannya :D
kak sya udh cba wktu d'run kluar tpi wktu diklik warnanya g ad prbhan, ap yg slah y ?
Balasbro untuk statement yang for for itu kok error ya bro, tulisanya kaya gini bro ")" expected
Balasempty statement after "for" harusnya diisi apa ya bro statementnya?
mohon bantuanya
Penulisan markup di komentar